Introduction
While Zoolz conducts automatic backups through its desktop application installed on computers and servers, it also offers a Vault folder. This feature enables users to manually upload selected files and folders to the Cloud from any machine, regardless of whether the Zoolz application is installed on it or not.
This article walks you through the process of downloading/restoring files from the Vault folder.
How to Restore Data from the Vault Folder
Method 1. Restoring Files via “Zoolz Restore” Desktop Application
Step 1. Open your Zoolz desktop application and click the Restore button. This will launch the Zoolz Restore application.
Step 2. Use the Computer Name drop-down menu to select the Vault option.
Step 3. Choose the desired data from the left-side panel and transfer it to the right-side panel using the Add ![]() icon. Once done, proceed by clicking the Next button.
icon. Once done, proceed by clicking the Next button.
Step 4. Specify the restore options before clicking the Next button to proceed.
During this restoration process, it is vital to maintain uninterrupted operation of your machine—avoid turning it off, logging out of your user profile, or activating sleep mode. Once files are ready and accessible, the download commences automatically. You may minimize or close the Zoolz Restore window without affecting the restoration progress.
Method 2. Download Data From the Zoolz Web Console
Step 1. Sign in to your Zoolz web console.
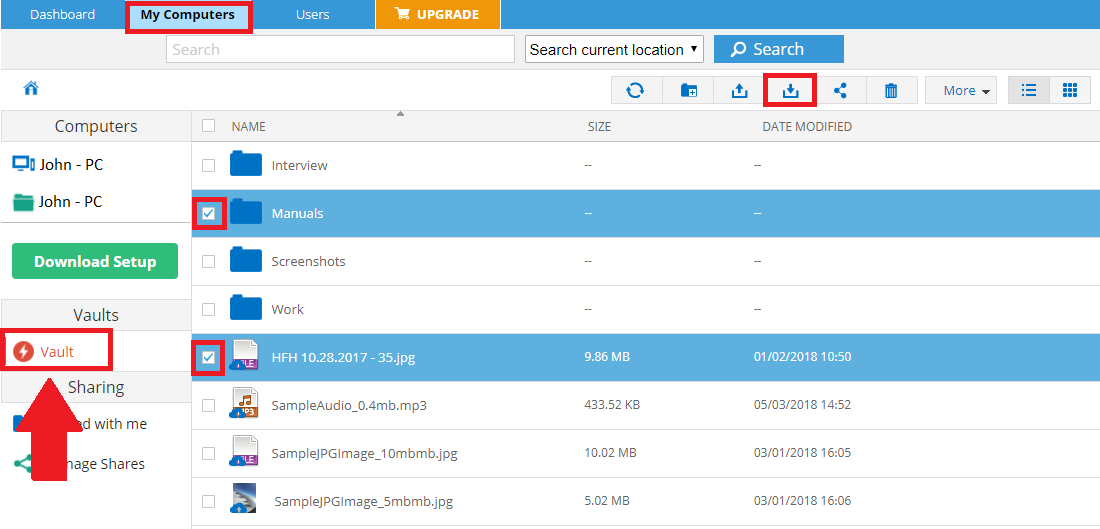
Step 2. Refer to the My Computers tab.
Step 3. Click the Vault option on the left-side panel to view the content of your Vault folder.
Step 4. Browse for the data you want to restore.
Step 5. Select the files/folders you want to download and click the Download icon.


