• Back to Zoolz.com
Zoolz Wiki
  • Back to Zoolz.com

Add a Computer to a Zoolz Account

/Account Management /Getting Started /Add a Computer to a Zoolz Account

Introduction

To back up data from any computer (whether Windows or macOS) to Zoolz, the computer needs to be added to the desired Zoolz account.

How to Add a Computer to a Zoolz Account

Step 1. On the target computer, sign in to the Zoolz web console as an admin user.

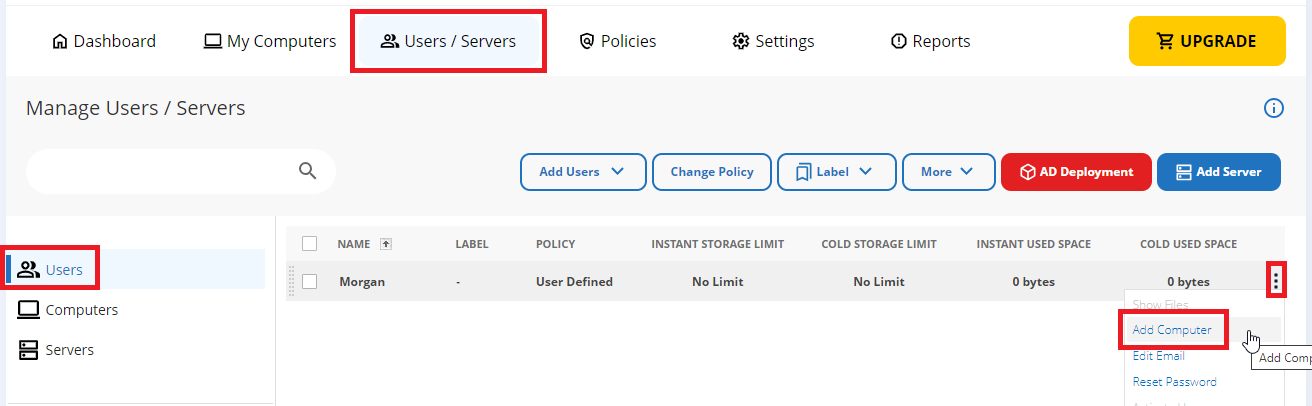
Step 2. Refer to the Users / Servers page.

Step 3. From the left-side panel of the opened Manage Users / Servers page, click on Users. A list of the users that are currently added to this account will be shown.

Step 4. To add a computer for an existing user, locate that user, click their Actions button, and choose the Add Computer option.

If you want to add a new user, please follow the steps here.

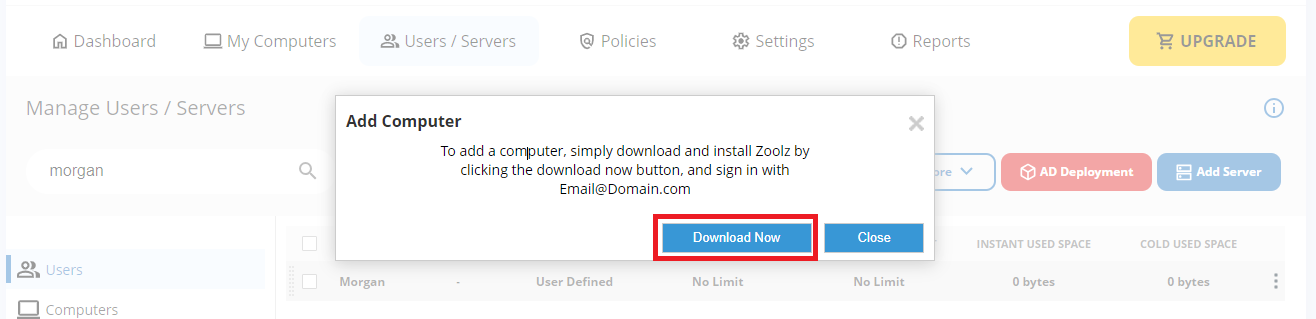
Step 5. In the Add Computer pop-up window, click on the Download Now button to download the Zoolz setup file onto the computer. Take note of the email address mentioned in the Add Computer pop-up window, as you will need to use it to activate the Zoolz desktop application once installed on the target computer.


Step 6. Run the downloaded setup file, install the Zoolz application, and activate it using the Zoolz login credentials of the user listed in the Add Computer pop-up window (step 5 above).

Step 7. Proceed with configuring the backup for this computer.

Once completed, the Zoolz application will begin backing up the selected data from this computer to the Cloud, and this data will be listed under the Zoolz profile of the selected user.


Tagged: addcomputers

Related Articles

  • Zoolz Global Settings

  • Activating Zoolz Account with a License Key

  • Zoolz Account Hierarchy

  • Restore Files with Zoolz (From Instant and Cold Storage)

  • Add Users to a Zoolz Account

  • Controlling Backups with Policies in Zoolz

Category Menu

  • Zoolz Videos
  • Getting Started
  • Account Management
  • Users Management
  • Data Backup and Management
  • Data Recovery
  • Backup Policies
  • Features and Functionalities
  • Permissions, Privacy and Security
  • Active Directory Deployment
  • Comparisons
  • Troubleshooting and Error Handling
  • Partners 1.0
    • Downloads
    • Reseller How To
    • Reseller APIs
  • Other
  • Release Notes (What’s New!)
© Copyright, Genie9 LTD 2021
Manage Consent
To provide the best experiences, we use technologies like cookies to store and/or access device information. Consenting to these technologies will allow us to process data such as browsing behavior or unique IDs on this site. Not consenting or withdrawing consent, may adversely affect certain features and functions.
Functional Always active
The technical storage or access is strictly necessary for the legitimate purpose of enabling the use of a specific service explicitly requested by the subscriber or user, or for the sole purpose of carrying out the transmission of a communication over an electronic communications network.
Preferences
The technical storage or access is necessary for the legitimate purpose of storing preferences that are not requested by the subscriber or user.
Statistics
The technical storage or access that is used exclusively for statistical purposes. The technical storage or access that is used exclusively for anonymous statistical purposes. Without a subpoena, voluntary compliance on the part of your Internet Service Provider, or additional records from a third party, information stored or retrieved for this purpose alone cannot usually be used to identify you.
Marketing
The technical storage or access is required to create user profiles to send advertising, or to track the user on a website or across several websites for similar marketing purposes.
Manage options Manage services Manage {vendor_count} vendors Read more about these purposes
View preferences
{title} {title} {title}