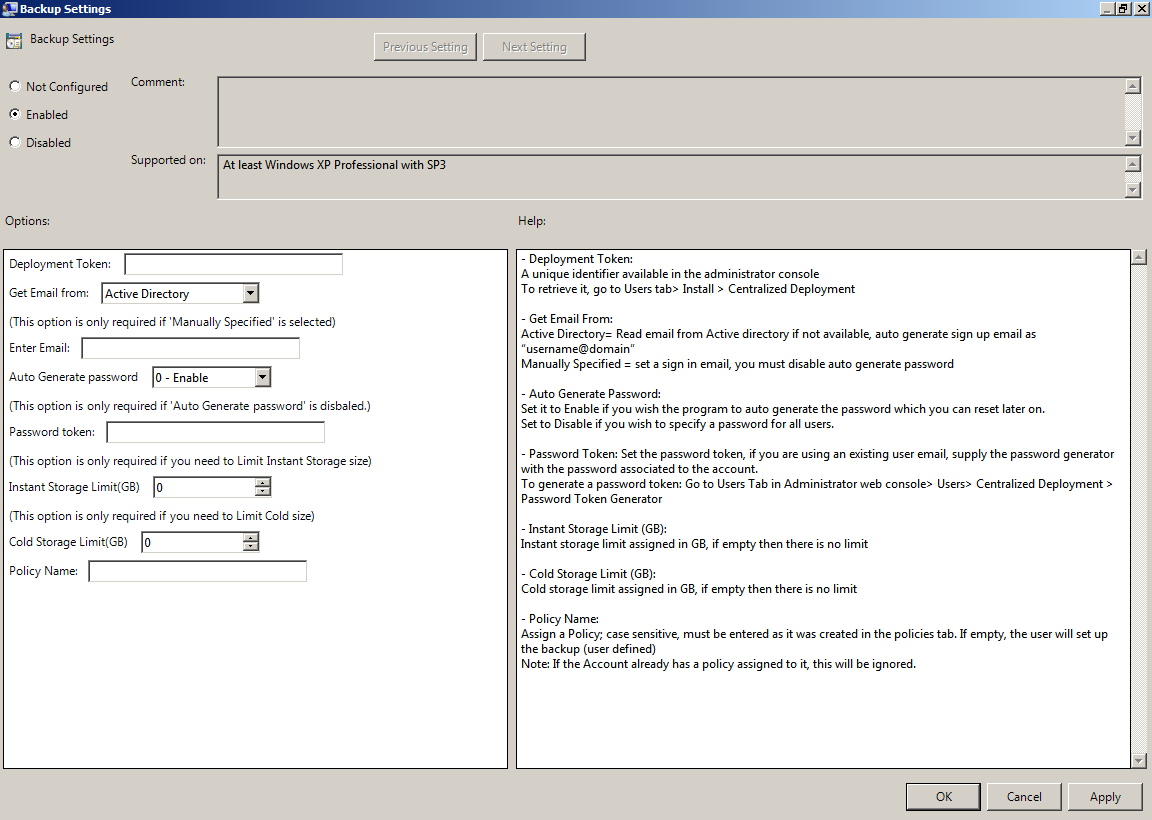
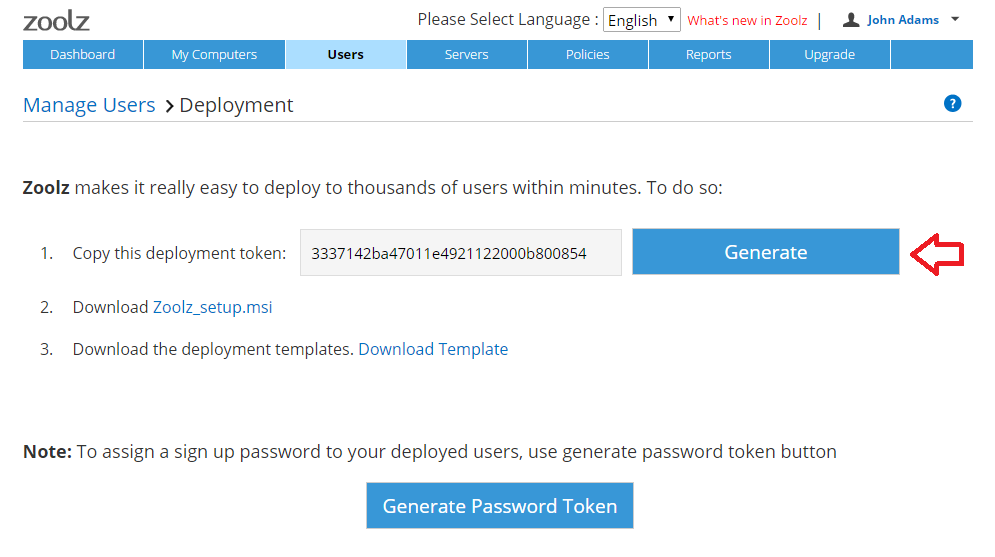
- Deployment Token: A unique identifier available in web admin console. Upon opening that page for the first time, a new generated token will be created and ready for use. You can generate as much new deployment tokens as you want. However, be sure to reflect the changes in the Group Policy settings. Then update the 1st field as seen in the above screenshot with the same matching deployment token saved in your account.
- Get Email From: In this setting, you have two choices: Active Directory and Manually Specified. The recommended and default choice is Active Directory. However, mainly for testing purposes, we have added manually specified if the need for it rises. Keep in mind that if you have specified Active Directory, and the user has a blank email, then his Windows username and domain will be used. for example: jack@company
- Enter Email: This option is only needed to be filled if Manually Specified was selected.
- Auto Generate Password: If set to Enabled, Zoolz will generate a secure selected password for every user. However, there is certain limitations: If the domain client uninstalled Zoolz and removed Zoolz AppData settings, then installed it back again on his machine, Zoolz windows client will not be able to login. The Zoolz agent in the system tray will show Awaiting activation when hovering over the icon. This is because the new installation generates a new secure password, that differs from the one stored under his web account. To solve this situation, the admin has two choices; delete the user account from the web admin console. The new installation will work, Zoolz windows client will login successfully and register a new user and his machine. The second choice would be using a password token.
- Password Token: To enable this setting, you will need to disable the Auto Generate Password. Go to the Users/Servers tab in web console. Click the AD Deployment button, and then the Generate Password Token button. Supply a password that is more than 6 characters, and copy/paste it in the password token field in the ADM file.This way even if a user uninstalled Zoolz, or removed his AppData, and installed Zoolz again on the same machine, the Windows client will log in, and register a new machine under that user’s account.

- Instant Storage Limit(GB): Self-explanatory, if the need arises you can specific a limit for Instant Storage.
- Cold Storage Limit(GB): Self-explanatory, if the need arises you can specific a limit for Cold Storage.
- Policy Name: If you want your domain users to have pre-selected folder paths, to get backed up, or pre-configured settings, like bandwidth limits, optional Passcode support, the ability to exit the program, and many more options, please first create a policy , save it, and copy its name to the policy field in the ADM file.
- Deployment Token: A unique identifier available in web admin console. Upon opening that page for the first time, a newly generated token will be created and ready for use. You can generate as much new deployment tokens as you want. However, be sure to reflect the changes in the Group Policy settings, and update the 1st field as seen in the above screenshot with the same matching deployment taken saved at your account.

- Get Email From: In this setting, you have two choices: Active Directory and Manually Specified. The recommended and default choice is Active Directory. However, mainly for testing purposes, we have added the Manually Specified if the need for it rises. Keep in mind that if you have specified Active Directory, and the user had blank email, then his Windows username and domain will be used, for example: jack@company
- Enter Email: This option is only needed to be filled if Manually Specified was selected.
- Auto Generate Password: If set to Enabled, BigMIND will generate a secure selected password for every user. However, there is certain limitations; If the domain client uninstalled BigMIND and removed BigMIND AppData settings, then installed it back again on his machine, BigMIND desktop client will not be able to login. The BigMIND agent in the system tray will show the Awaiting activation notification when hovering over it. This is because the new installation generates a new secure password, that differs from the one stored under his web account. To solve this situation, the admin has two choices; either delete the user account from the web admin console. The new installation will work and BigMIND desktop client will login successfully to a registered new user and his machine. The second choice would be using a password token.
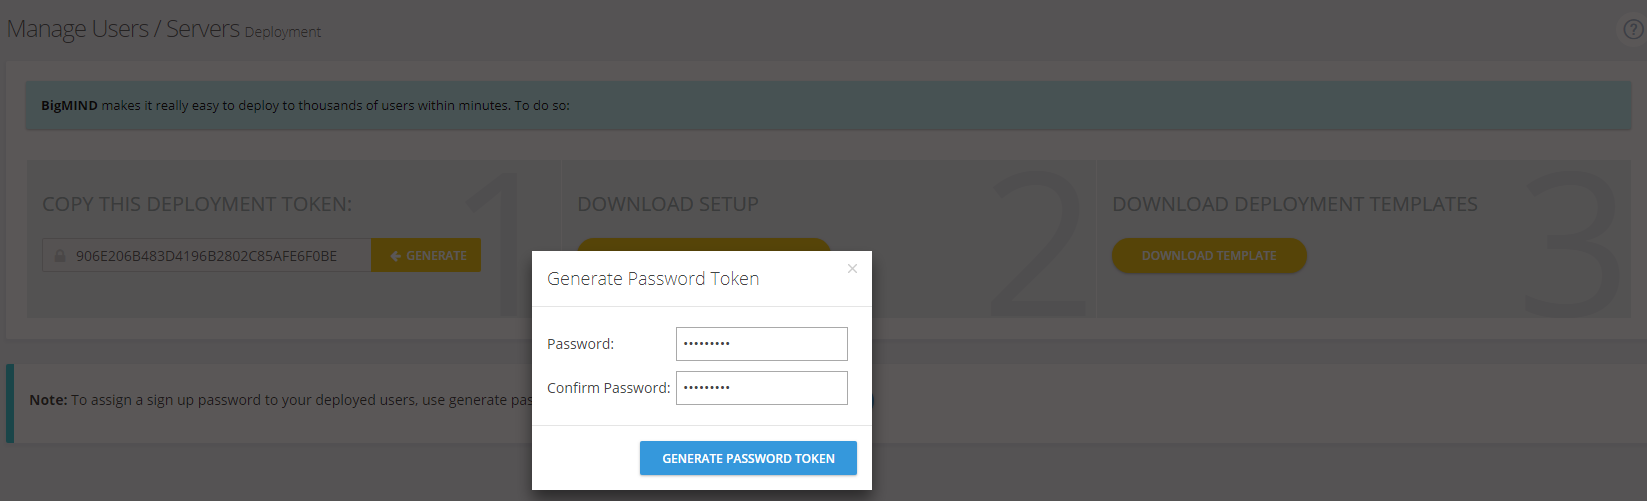
- Password Token: To enable this setting, you will need to disable the Auto Generate Password. Then go to the Users/Servers page in web console. Click the AD Deployment button. Click the Generate Password Token button. Supply a password that is more than 6 characters, and copy/paste it in the password token field in the ADM file. This way even if a user has uninstalled BigMIND, the Windows client will log in, and register a new machine under that user’s account.
- Instant Storage Limit(GB): If needed you can specify a limit for Hot Storage.
- Cold Storage Limit(GB): If needed you can specify a limit for Cold Storage.
- Policy Name: If you want your domain users to have pre-selected folder paths to get backed up, or pre-configured settings. Like bandwidth limits, optional password support, the ability to exit the program, and many more options, please first create a policy You can then save it, and copy its name to the policy field in the ADM file.